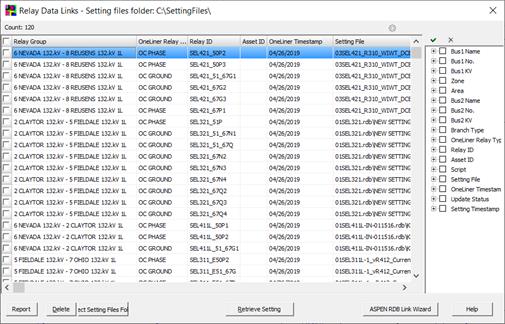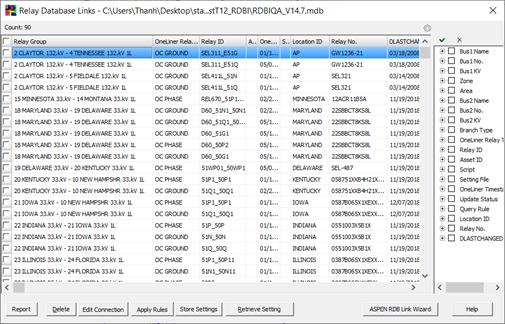
The Relay Data Link Dashboard command will let you work with relays in OneLiner file that are linked to external setting data source, such as ASPEN Relay Database (RDB), ENOSERV PowerBase database or to data in manufacturer setting files. Using the dashboard commands you can retrieve settings and edit data link attributes for all linked relays. For relays linked to the ASPEN Relay Database, the Dashboard includes commands for updating data linkage attributes. From the Dashboard you can also launch the ASPEN RDB Link wizard to create new external datalinks for existing ande new relays in the OneLiner network. See APPENDIX G: EXTERNAL RELAY SETTING DATA for more information on external setting links.
TO OPEN THE RELAY DATALINK DASHBOARD:
1. Select the Relay | Relay Database | Relay Data link Dashboard command.
The dashboard appearance will be different for OneLiner network with relays linked to different data sources. In the two pictures below are the dashboard with 1) links to setting files in disk folder; and 2) links to relays in the ASPEN Relay Database respectively


Click on the column header field to sort data rows by that column
Expand the Data filter tree on the right hand-side panel to select desired filter values.
Click on the button  to apply the filter and display only
data rows that match the chosen filer.
Click on the button  to remove the applied data filter and
display all data rows.
Click on the button  to save the entered filter rules to a
disk file, which you can load to the dashboard using the button
  at any time later.
TO RETRIEVE RELAY SETTINGS FROM EXTERNAL DATA SOURCE:
1. Mark the check box on all linked relays you want to retrieve setting.
You can apply desired filter to show only relays you want to retrieve and use the check box on the heading row to mark or unmark all data rows.
2. Click on Retrieve button to retrieving settings.
The program will display a progress bar control with status of the data transfer process.
To stop the transfer Click on the Cancel button on the progress bar control.
When data transfer is complete, the Setting comparison dialog box will appear to let you review newly retrieved settings. Use the button controls in the dialog box to accept or reject changes.
TO STORE RELAY SETTINGS FROM ONELINER TO ASPEN RELAY DATABASE:
1. Mark the check box on all linked relays you want to store setting.
You can apply desired filter to show only relays you want to retrieve and use the check box on the heading row to mark or unmark all data rows.
2. Click on Store button to transfer settings to the ASPEN relay database.
NOTE: The Store command is the first in the two-step process for transfering OneLiner relay data to the relay database. This step is designed to copy to the ASPEN relay databse all parameters of selected OneLiner relays verbatim. User will need to perform the second data transfer step in the ASPEN relay database program to apply stored OneLiner relay data to desired setting request. For additional detals, see section G.3 TRANSFER LINKED ONELINER RELAY DATA TO ASPEN RELAY DATABASE
TO EDIT ASPEN RDB CONNECTION ATTRIBUTES:
1. Select the linked relay you want to modify and click on the Edit Connection button.
The Link to ASPEN Relay Database wizard will appear to let you select the desired relay in the RDB as well as to specify other relevant linkage attribute: setting request rule name, data mapping script name and command line options, etc. For additional details, see APPENDIX G: EXTERNAL RELAY SETTING DATA and also 5.2 OVERCURRENT GROUND RELAYS and 5.6 DISTANCE GROUND RELAYS.
TO APPLY ASPEN RDB SETTING REQUEST QUERY RULE:
1. Mark the check box on all linked relays you want to apply new rule and click on Apply rules.
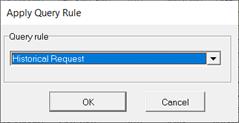
The Apply Query Rule dialog box will appear with a dropdown list of all setting request query rules in the ASPEN RDB:

2. Select desired setting request query rul from the dropdown list and click on OK to apply it to the selected linked relays.
The selected query will be executed when you will subsequently run the Retrieve setting command for these relays.
TO CREATE ASPEN RDB LINK FOR EXISTING OR NEW RELAYS:
1. Click on the ASPEN RDB Link Wizard button.
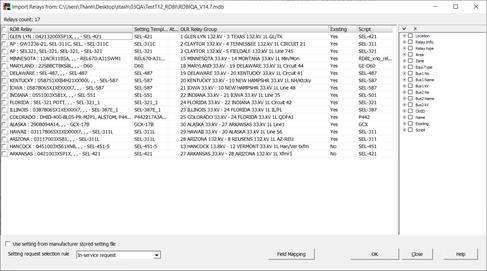
The Import Relays from dialog box will appear:

The Wizard creates links in the OneLiner network to relays in RDB automatically by correlating OneLiner network buses, lines and transformers data attributes to data fields in the RDB tables. This is a multi-step process:
- First the wizard will correlate OneLiner Bus to an RDB Location: OneLiner bus name or a tag string with a special prefix are used as the key to match a seleted data field in the RDB TLOCATION table.
- In the next step, the wizard will match the name or a tag string of a line or transformer at the bus to selected data field in the RDB TRELAY table to link OneLiner relays in relay group on the line/transformer to the matched relay in the RDB.
For example a OnLiner relay in a relay group on transmission line with name “QLX1” at the Nevada 132kV can be automatically linked by the wizard to RDB relay having “Location ID” attribute value of “Nevada” and “Protecting” attribute value of “QLX1”.
Click on button Field Mapping to customize the selection of key data fields that the wizard uses to correlate data in RDB and in OneLiner network.
- Lastly, the wizard will lookup the name of data mapping script in the RDB or in the RDBI library for the setting template of the matched RDB relay to store as part of the data link.
The Wizard displays list of all data links that it created in the grid.
Mark the check box on the data links that you want to import to OneLiner and click OK button to store the links in OneLiner network.
Main Window
RELAY MENU