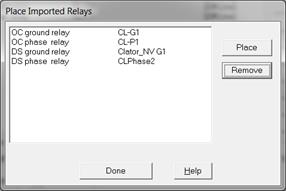
The Place Imported Relay command in the Main Window lets you place an imported relay into a relay group. The “imported relays” come from the Relay | IMPORT RELAY COMMAND in the Main Window. These relays have to be placed manually because the location information was either missing or invalid. Before these relays are placed, they are said to be in a “holding tank”.
You can also use this command to remove relays from the holding tank.
TO PLACE A RELAY IN THE HOLDING TANK:
1. Select the relay group in which you wish to place one or more relays.
Click the left mouse button once on the relay group.
The selected relay group will turn dotted red.
2. Select the Relay | Place Imported Relay command.
Note: This menu item is dimmed and cannot be activated if there is no imported relay.
A dialog box will appear displaying a list of imported relays that you can place into the selected relay group.

3a. Select a relay you want to place into a relay group by clicking on its name.
4a. Press Place to place the selected relay into the selected relay group.
5a. Repeat steps 3a through 4a for all the relays that you want to place into the selected relay group.
6a. Press Done to close the dialog box.
TO REMOVE RELAYS FROM THE HOLDING TANK
Removing unwanted relays from the holding tank will help to (1) make the data file size smaller, and (2) clear the holding tank for future import-relay operations. When removing relays, you can select any relay group in step 1.
3b. Select a relay you want to remove from the holding tank by clicking on its name.
4b. Press Remove to remove the relay.
This effectively deletes the relay.
5b. Repeat steps 3b through 4b for all the relays that you want to delete.
6b. Press Done to close the dialog box.
Main Window
RELAY MENU