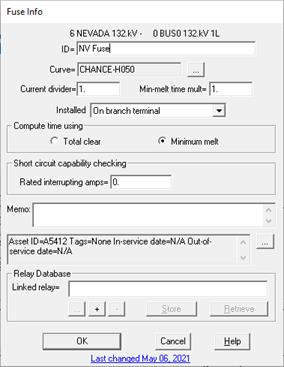

The following are instructions to enter the data for a new fuse:
1. Enter the basic data.
ID: Enter a name with up to 24 characters. We recommend that you include in the ID certain mnemonics that identifies the device as a fuse. For example, you may want to end the ID with the letter 'F' to denote a fuse. The ID only has to be unique among fuses and overcurrent relays in the same relay group.
Asset ID: An identifier for facilitating data exchange with external databases. The asset ID can have up to 127 characters.
Curve: Click on the ‘…’ button to bring up the Curve Selector. Select a curve in the curve library and press ‘Select this curve’. The name of the selected curve will be copied to the Curve edit box.
Note: Detailed instructions on how to use the Curve Selector are available in Section 5.8 CURVE SELECTOR.
Current divider: Enter 1 unless you are paralleling more than one fuse of the same type to achieve a higher current rating. Enter 2 if you have two fuses in parallel, and 3 for three fuses, and so on.
Minimum-melt time multiplier: Enter a multiplier between 0.0 and 1.0 to lower the minimum-melt curve to account for pre-heating of the fuse. In some textbooks, this time multiplier is referred to as the “K factor” (not to be confused with the K factor of a ground distance relay.)
Install: Select one of the following in the ‘Install’ drop-down combo box:
On branch terminal if this fuse is installed on the terminals of the equipment.
Inside tertiary winding if this fuse is installed inside the delta winding of a 3-winding transformer.
3. Enter the rated interrupting current in amperes.
This datum is not in use since version 11.
4. Select the fuse operating time.
Click on either the Total clear or Minimum melt radio button.
A fuse has two curves: the total-clear curve, which is the upper curve, and the minimum-melt curve. The curve you select is used for computing the fuse operating time.
5. Enter a memo.
The memo is for any notes you wish to keep for this fuse. It can have up to 512 characters.
Click on the … button near the upper right corner of the text area below the Memo field to open the Supplemental Object Properties dialog box with a data grid to enter data for the following data fields:
6. In/Out of service date: Click on the … button and enter the desired dates. See the Details and Techniques section “In/Out of service and tags” for more information.
7. Asset ID: An identifier for facilitating data exchange with external databases. The asset ID can have up to 127 characters.
8. Tags: Enter list of tag strings separated by semicolon. The tags are for organizing objects that are related for some purpose. Please see documentation for Network | Apply Tag for more information.
9. User-defined fields: These are custom data fields that are defined by the user. Please see documentation for File | Preferences for information about how to specify the template for these data fields.
LINK TO ASPEN RELAY DATABASE:
10. See instructions in Section 5.9 LINK TO ASPEN RELAY DATABASE .
See, also, APPENDIX G: EXTERNAL RELAY SETTING DATA for a more detailed discussion on the linkage to the Relay database.
TO CLOSE THE FUSE DIALOG BOX:
11. Press OK to close the Fuse Data dialog box.