The Stepped Event Analysis | Multiple User-Defined Event command in the Main Window lets you perform a stepped-event analysis with a initiating event at t=0, plus a number of subsequent events at t>0. (The total number of user-define events is limited to 8.) . The initiating event must be a bus fault, a close-in fault or an intermediate fault. The additional user-defined events give you the flexibility to change the fault connection (from a single-line-to-ground fault to a two-line-to-ground fault, for example) and fault impedance. The program will simulate the user-defined events and tripping and reclosing events until the faults are cleared or when no further tripping or reclosing events are forthcoming.
Once the program completes the stepped-event simulation, you can play back the events one by one on the one-line diagram.
TO PERFORM A STEPPED-EVENT SIMULATION WITH MULTIPLE USER-DEFINED EVENTS:
1a. Starting from events that were previously saved: Press the Load button to open a stepped-events file.
A file-open dialog box will appear. Use the controls in the standard file-open dialog box to open the .SEA file. Proceed to step 4 to add events, or to step 5 to edit and delete events.
1b. Defining the events from scratch: Depending on the initiating fault, highlight either a bus, a relay group or a line on the one-line by clicking on its symbol with the right mouse button.
For a bus fault, highlight a bus.
For a close-in fault, highlight a relay group.
For an intermediate fault on a transmission line, highlight either a relay group on the line or the line itself.
Note: If you highlight the line for an intermediate, the terminal bus that is closest to your mouse click will be considered 0%, and the opposite bus terminal 100%.
2. Select the Faults | Stepped Event Analysis | Multiple User-Defined Event command.
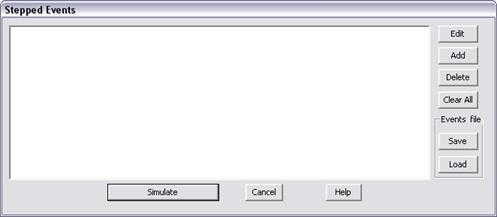
A dialog box with a list box and a number of buttons will appear. The list box, which is blank initially, will list the events you define in the steps that follow.

3. Press Add to specify the initiating fault.
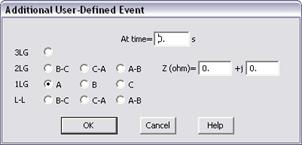
A fault-specification dialog box will appear in front of the first dialog box. This is the same fault-specification dialog box in the Faults | Stepped-Event Analysis | Single User-Defined Event command.
Enter the fault specification at t=0. Press OK.
A description of this user-defined event will appear in the list box of the Stepped Events dialog box.
4. Press Add again to specify another user-defined event.
An abbreviated user-define event dialog box will appear.

Enter the time of this event, in seconds, at the “At time” edit box.
Change the fault type to simulate an evolving fault. Otherwise, lease the fault type unchanged.
Change the fault impedance as needed.
Press OK.
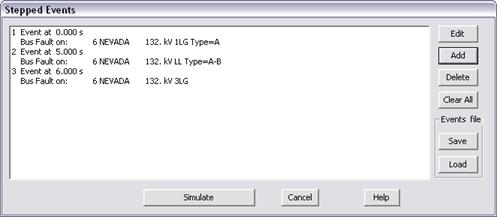
A description of this user-defined event will be added to the list box of the Stepped Events dialog box. A sample dialog box with three events is shown below.

5. Highlight one of the events in the list box and press the Edit to edit that event.
A dialog box will appear to allow you to edit that event.
Note: If you change the ‘At time’ field, the program will re-sort the entire list of user-define events in ascending order of time. For that reason, the highlighted event after editing may not be the same event you highlighted earlier.
6. Highlight one of the events in the list box and press the Delete button to delete that event. Press Clear All if you wish to clear all the events you defined and start over.
7. Optional: Use the Save command to save the events to a text file with .SEA extension.
8. Press Simulate to commence simulation.
Please see steps 3 and 4 of the documentation for the Faults | Steps Event Analysis | Single User-Defined Event for instructions on viewing the results and terminating the stepped-event mode.
Main Window
FAULTS MENU