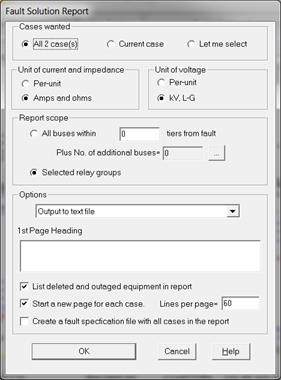
The Solution Report command in the Main Window writes all or part of the fault-simulation results to a text file, the TTY Window, a CSV file, or the printer. You must simulate the faults before executing this command.
Two types of output are available, the bus-oriented report format that is described in Section 7, or a table of relay voltages and currents for the selected relay groups.
TO OUTPUT FAULT SOLUTION IN TEXT:
1. Optional: Select one or more relay groups on the one-line diagram if you plan on outputting the relay voltages and currents.
2. Select the Faults | Solution Report command.
Note: This menu item is dimmed if there are no simulation results, or if you have modified the network since the last fault simulation.
A dialog box will appear asking you to specify the coverage and output medium and other parameters.

3. Select the number of cases to be written out. Click on:
All XX Case(s): To output all of the cases. XX is the total number of available cases.
Current Case: To output only the case being displayed on the one-line diagram. This option is disabled if a fault solution is not being displayed.
Cases that I will select: To output only the case to be selected manually.
4. Select the output units.
In the Unit of current and impedance group box, click on Per-unit to display currents and impedances in per unit, or on Amps and ohms to display currents and impedances in physical units.
In the Unit of Voltage group box, click on Per-unit to display bus voltages in per unit, or on kV, L-G to display voltages in kV, line-to-ground.
5. Specify the report type and scope.
Click on All buses within radio button to output the solution in the standard bus-oriented format.
Enter the number of tiers from the fault. A value of 0 will give you the buses that are directly involved in the fault. A value of 1 will yield buses of tier 0, plus their immediate neighbors, and so on. .
If needed, press the … button to specify additional buses. The Bus Selector dialog will appear. Use the controls in the bus selector to select the additional output buses. See APPENDIX H: BUS SELECTOR for more information on the Bus Selector.
Click on Selected Relays to output the relay voltages and currents for the selected relay groups.
Note: The Selected Relays radio button is enabled only if you have selected one or more relay groups prior to issuing the Solution Report command.
6. Choose the output medium.
Select Output to text file to send the fault solution(s) to a text file.
Select Output to TTY Window to write the fault solution(s) to the TTY Window.
Select Output to printer to send the fault solution(s) to the printer.
Select Output to CSV file to write the fault solution(s) to a CSV-formatted file that can be open with any spreadsheet program.
7. Enter the first page heading.
This text will appear on the top of the first page.
8. Mark the List deleted and outaged equipment in the report check box to have this information listed at the beginning of the report.
9. Mark the Create a fault specification file for cases in the report check box to create the file.
10. Additional parameters for output to text file.
These include the option to start a new page for each case, and the number of lines per page.
11. Press OK
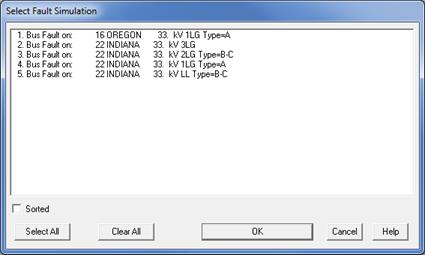
If you selected Cases that I will select in step 3, a dialog box will appear to ask you to pick one or more cases that have been simulated. Highlight the cases you want with the mouse and press OK.

If you selected Output to text file in step 6, a standard new-file dialog box will appear to let you enter the name and location of the output file. OneLiner’s Text Report Viewer Window will open to show you the output. Use commands near the top of the window to view an index and to navigate between different cases. See Section 3.7 for more information on the Text Report Viewer Window.
If you selected Output to TTY Window in step 6 the TTY Window will open to show you the output.
If you selected Output to printer in step 6, a dialog box will open to let you specify the printer font. Printing will commence when you close the font dialog box.
If you selected Output to CSV file in step 6, the program will open the output file in a spreadsheet program to show you the report.
If you elected to create a fault specification file in step 9, a standard new-file dialog box will appear to let you enter the name and location of a new .FLT file. See Appendix I for more information on fault specification files.
Main Window
FAULTS MENU