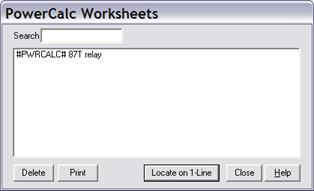
The PowerCalc Worksheets command in the Main Window helps you locate on 1-line, delete and print content of PowerCalc worksheets.
1. Select the Tool | PowerCalc Worksheet command.
A dialog box will appear displaying a list of PowerCalc worksheets in alphabetical order. The “Title” of each spreadsheet occupies one line in the dialog box.

TO LOCATE A WORKSHEET:
2. Select the PowerCalc worksheet by clicking on it.
Note: Type in the Search edit box one or more characters of the worksheet tile. The entry that begins with the letters you entered will appear in the list box highlighted.
3. Click Locate on 1-Line.
The dialog box will disappear and the annotation will appear in the center of the screen.
Note: This feature effectively allows you to use the annotations as bookmarks in the one-line diagram.
TO DELETE WORKSHEETS:
4. Select the PowerCalc worksheet(s) by clicking on it. You can use the Ctrl- and Shift keys to extend your selection.
5. Press Delete.
A dialog box will appear to ask you to confirm the delete operation.
TO PRINT SPREADSHEETS TO COMMA DELIMITED FILE:
6. Select the PowerCalc worksheet(s) by clicking on it. You can use the Ctrl- and Shift keys to extend your selection.
7. Click Print. A File Save dialog box will appear to ask you to enter the CSV file name.
The program will carry out the spreadsheet Recalc command and save the content of the Print Area to the CSV file. If the worksheet has no pre-defined Print Area, the entire sheet will be saved.
Main Window
TOOLS MENU