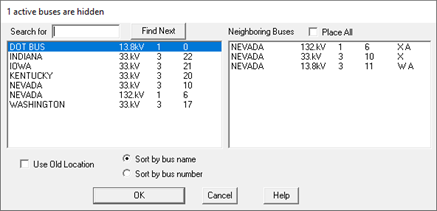
Some buses in the system may not be visible on the one-line diagram because (1) they came from a text data file and no one has placed them on the one-line diagram previously, or (2) they were placed and subsequently made invisible with the Diagram | Hide Bus or Diagram | Hide/Show commands. This Place Buses command in the Main Window lets you place a hidden bus on the one-line diagram and make it visible on the on-line diagram. The program will automatically display branches that connect this bus to neighboring buses that are already visible on the one-line. If the bus to be placed was hidden previously with the Diagram | Hide Bus command, you have the option of restoring the bus to its old position.
TO PLACE A BUS ON THE ONE-LINE DIAGRAM:
1. Select the Diagram | Place Buses command.
A dialog box will appear. Displayed in the left list box are all the buses in the system. You can change sort order with the radio buttons labeled “Sort by bus number” and “Sort by bus number”. The visible buses are shown with the letter ‘A’ following the bus name. One of these buses is selected. The list box on the right shows its neighboring buses. Again, the letter ‘A’ denotes visible buses.

2. Search and select a bus to be placed on the one-line diagram.
If the buses are sorted by name, enter one or more characters of the bus name in 'Search For'. If the buses are sorted by bus number, enter one or more digits of the bus number.
The fist bus with the match will automatically appear in the window highlighted. Use the Find Next button to highlight the next match, if there is any.
In the left pane, click on the identifier of the bus to be placed.
3. Select the neighboring buses to be placed on the one-line diagram.
Mark the "Place All" checkbox if you want to place not only the selected bus but also all its neighboring buses. You may alternatively select neighboring buses to be place by clicking on their identifiers.
4. Mark the Use Old Location check box to place buses at their previous locations.
A bus has a “previous location” if it was visible at one time, before it was hidden. The “Use Old Location” option is dimmed and unavailable if there is no previous location information.
5. Press OK.
The dialog box will disappear. The selected bus and its neighboring buses will be drawn on the screen. If the selected bus is out of the viewable portion of the screen, the program will scroll the one-line diagram to bring the selected bus to the center of the Main Window. The neighboring buses will automatically be placed around the bus.
All of the branches that connect the bus to its neighboring buses will be automatically added along with any attached equipment, such as generator, load or shunt.
A bus is drawn with a hollow bus symbol if it has one or more invisible neighbors.
After the last bus is placed on the screen a message box will appear informing you that the one-line diagram has been completed.

Main Window
DIAGRAM MENU