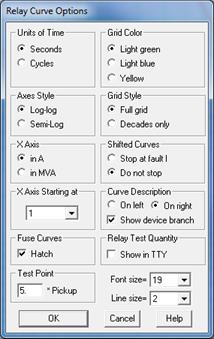
The Options command in the OC Curves Window lets you specify various options for the window. These include the (1) unit of time, (2) grid color and style, (3) layout and style of axes, (4) shifted curve style, (5) curve description location, (6) whether to hatch fuse curves, (7) whether to display the relay test quantity in the TTY window, (8) test point and (9) font size.
TO SPECIFY THE OPTIONS FOR THE OC CURVES WINDOW:
1. Select the Misc | Options command.
A dialog box will appear asking you to specify the options for the overcurrent relay plot.

2. Select the units of time. Click on:
"Seconds" to use seconds as units of time.
"Cycles" to use cycles as the units of time. Note: You can specify the system frequency in the Network | Options dialog box.
This selection will affect the layout of the plot as well as the textual output of the relay operating times.
3. Select the Grid Color. Click on "Light green", "Light blue" or "Yellow".
4. Select the Grid Style. Click on "Full grid" or "Decades only".
5. Select the Axes style. Click on "Log-log" or "Semi-log".
The log-log plot uses a logarithmic scale for both axes. The semi-log plot uses a logarithmic scale for the horizontal axis (current) and a mixture of logarithmic and linear scales for the vertical axis (time). The axis is linear below 2 seconds and logarithmic above 2 seconds. Warning: Not all the commands in the OC Curves Window work under the Semi-log option.
6. Select the units for the X axis. Click on:
"in A": To display the horizontal axis in A.
"in MVA": To display the horizontal axis in MVA. Note: There are two ways to compute fault MVA. See Network | Options dialog box for details.
7. Select where you want the X axis to start. Select either "1", "10", or "100” amperes or MVA.
8. Specify whether you want the automatically shifted curves to continue beyond the total fault current. Click on "Stop at fault I" or "Do not stop".
The "Stop at fault I" option displays the relay curves only for currents less than the fault current. The "Do not stop" option extends the curves beyond that point.
9. Select the Location of the Curve Description. Click on "Left" or "Right".
The program will use the left side or the right side of the grid as the default location of the relay curve descriptions. The other side of the grid is the default location of the damage curve descriptions. The fault description, if any, is below the last relay curve description. As always, you can move the descriptions with the mouse.
Mark the “Show device branch” check box if you want the relay ID to include the terminal bus name and circuit ID of the branch where it resides.
10. Click on "Hatch" in "Fuse Curve" group box to fill the area between the total-clear curve and the minimum-melt curve with a hatch pattern.
11. Click on "Shown in TTY" to display the Relay Test Quantity on the TTY Window.
The pre- and post-fault voltage and secondary current of the relays will be displayed in TTY Window when executing the “Relay Operations for 1 Fault” command. You can select and copy the relay test quantities in the TTY Window to the clipboard, and then paste the data from the clipboard to your text data file for relay testing.
12. Enter the test point in "Test Point".
The program will show in the relay description the time delay at a test point, in the form, TP=xxx. The default value of 5.0 means that the time delay is for 5 times the pickup setting. If the test point is set to 0.0, the TP=xxx entry will not be shown in the relay description.
13. Click on "Font size" and select the desired font.
Font sizes 8 to 28 are available. The program will use the selected font size for the text in the client area of the Curve Window.
14. Click on "Line size" and select the desired curve thickness.
The thickness of the curves can be 1, 2 or 3 pixels.
15. Press OK.
The dialog box will disappear and the graph will be redrawn with the options you selected. Your options are stored in the Window registry. They will be used automatically from now on, unless you change them with this command.
Curves Window
MISC MENU