 on the Device Palette. The cursor
will become a cross with a transformer symbol attached to it.
on the Device Palette. The cursor
will become a cross with a transformer symbol attached to it.The New | Switch command in the Main Window lets you add a new switch between two buses of the same nominal kV. Within the program, switches are modeled as low impedance lines. You can adjust the impedance in the Network tab of the File | Preferences command. Starting with v14, the program allows parallel switches between two buses.
TO ADD A NEW SWITCH FROM THE DEVICE PALETTE:
1a. Select New Switch on the Device Palette
Click on the New Switch button  on the Device Palette. The cursor
will become a cross with a transformer symbol attached to it.
2a. Drag-and-Drop the new switch
Click the left mouse button on the one-line where you want to place the first terminal of the switch. With the mouse button held down, move the cursor toward the spot where you want to place the other terminal. A new switch symbol will appear with its second terminal moving with the cursor.
Note: Clicking on an existing bus will attach the switch to that bus. Clicking on the end segment of an existing branch will place the new switch in series with that branch.
Release the mouse button where you want to place the second terminal. A dialog box will appear asking you for the switch data.
Note: When you move the second terminal over an existing node having the same kV, the bus will be highlighted in red. You can release the mouse button to attach the switch to this node.
Enter nominal kV for the new switch’s terminals where neither terminal is connected to an existing bus.

Note: If you place the second terminal too close to the first one, the New Switch command will be ignored.
TO ADD A NEW SWITCH USING MENU COMMAND:
1b. Select the two terminal buses.
Click the left mouse button once on one of the terminal buses or nodes. Then with the <Shift> key held down, click the left button once on the other terminal bus. The two terminal buses must have the same nominal kV.
Both bus symbols will turn dotted red when selected.
2b. Select the Network | New | Switch command.
Note: The Switch menu item is dimmed and cannot be activated if the nominal kVs of the two terminal buses are not the same.
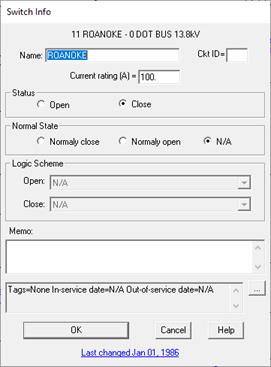
A dialog box will appear asking you for the switch data.
3. Enter the switch parameters.

Ckt ID: A two-character circuit identifier that is used to differentiate between parallel switches.
Name: A 16-character name for the switch.
Current rating in amps: The Power Flow program uses this rating to check for overloaded switches.
Status: Click on either 'Open' or 'Close'.
Normal State: The “Normal” state of the switch. It can be Normally Close, Normally Open, or not specified (N/A). This value is used by the Network | Set All Switches to Normal State command.
4. Enter switch open/close logic.
This feature will be available in a future release of the program.
5. Enter a memo.
The memo is for any notes you wish to keep for this switch. It can have up to 512 characters.
Click on the … button near the upper right corner of the text area below the Memo field to open the Supplemental Object Properties dialog box with a data grid to enter data for the following data fields:
6. In/Out of service date: Click on the … button and enter the desired dates. See the Details and Techniques section “In/Out of service and tags” for more information.
7. Tags: Enter list of tag strings separated by semicolon. The tags are for organizing objects that are related for some purpose. Please see documentation for Network | Apply Tag for more information.
8. User-defined fields: These are custom data fields that are defined by the user. Please see documentation for File | Preferences for information about how to specify the template for these data fields.
9. Press OK to close the 'Switch Info' dialog box.
A new switch symbol will be shown.
Main Window
NETWORK MENU