 on the Device Palette. The cursor
will become a cross with a dc line symbol attached to it.
on the Device Palette. The cursor
will become a cross with a dc line symbol attached to it.The New | 2-Terminal DC Line command in the Main Window lets you add a new 2-terminal, capacitor-commutated dc line between two buses. The dc line object includes the commutation transformers at both terminals.
TO ADD A NEW DC LINE FROM THE DEVICE PALETTE:
1a. Select New 2-Terminal DC Line on the Device Palette
Click on the dc line button  on the Device Palette. The cursor
will become a cross with a dc line symbol attached to it.
2a. Drag-and-Drop the new dc line
Click the left mouse button on the one-line diagram where you want to place the first converter terminal of the new dc line. With the mouse button held down, move the cursor toward the spot where you want to place the other end. A new dc line symbol will appear with its far end moving with the cursor.
Note: Clicking on an existing bus will attach the first converter terminal of the new dc line to that bus. Clicking on end segment of an existing branch will place the new dc line in series with that branch.
Release the mouse button where you want to place the second converter terminal. A dialog box will appear asking you for the dc line data.
Note: When you move the dc line’s far end over an existing bus, the bus symbol will be highlighted in red. You can release the mouse button to attach the second end of the dc line to that bus.
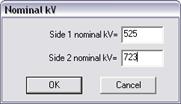
Enter the nominal kV for the new dc line’s converter terminals when one or both terminals are not connected to an existing bus.

Note: If you place the second end of the dc line too close to the first one, the program will ignore the command.
TO ADD A NEW DC LINE USING MENU COMMAND:
1b. Select the two terminal buses.
Click the left mouse button once on one of the terminal buses and then with the <Shift> key held down, click the left button once on the other terminal bus.
Both bus symbols will turn dotted red when selected.
2b. Select the Network | New | 2-Terminal DC Line command.
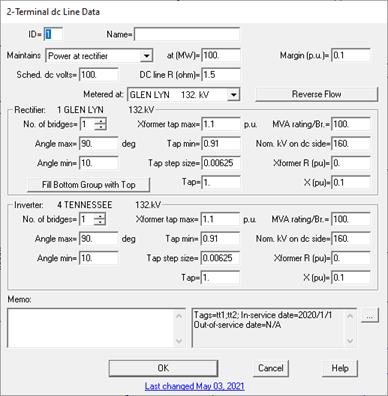
A dialog box will appear asking you for the parameters of the new dc line.
3. Input the dc line identifiers.
The two converter terminals of the dc line are listed as captions of two large group boxes. Initially, the first bus you selected is assumed to be the rectifier terminal, and the second the inverter terminal.
Reverse flow: Press this button to change the role of the two converter terminals: The rectifier will become the inverter; the inverter will become the rectifier. The caption of the two group boxes will change accordingly.

Ckt ID: A two-character circuit identifier that is commonly used to differentiate between parallel dc lines. The program automatically initializes the circuit ID of a new dc line to a numeric value that has not been used by a parallel dc line.
Name: A 16-character name for the dc line.
4. Input the dc line parameters.
Maintains: Select one of three possible control modes in the drop-down list box: constant power at the rectifier, constant power at the inverter, or constant current.
At: The exact labeling is “at (MW)” if constant power, and “at (A)” if constant current. Enter the control target in the edit box. This value must be positive.
Margin: Enter the control margin in per-unit. When the dc line is under constant-power control and the rectifier’s voltage is too low, the program will reduce the MW target by this amount.
Scheduled dc voltage: Scheduled dc voltage magnitude in kV. This value must be positive.
DC line R: Resistance of the dc line in ohms. This value must be positive.
5. Input the converter parameters.
Enter the following parameters for both the rectifier and the inverter.
No. of bridges: Number of bridges that are connected in parallel on the ac side and in series on the dc side. This value must be a positive integer.
Angle Max: Maximum value of alpha in degrees at the rectifier, or maximum gamma at the inverter.
Angle Min: Minimum value of alpha in degrees at the rectifier, or minimum gamma at the inverter.
Transformer tap max: Maximum tap position of the commutation transformer in per-unit. The movable tap is assumed to be on the ac side of the transformer.
Transformer tap min: Minimum tap position of the commutation transformer in per-unit.
Transformer tap step size: Enter 0 if the tap can be moved continuously. Otherwise, enter the step size in per-unit.
Transformer tap: The tap is initialized to 1.0 per unit at the beginning of each power flow solution. After convergence, this edit box shows the tap position given by the power flow solution.
MVA rating per bridge: The MVA rating of each commutation transformer.
Nominal kV on dc side: The nominal kV at the dc side of the commutation transformer. (The nominal kV at the ac side is assumed to be the nominal kV of the terminal bus.)
Transformer R, X: The impedance of the commutation transformer in per-unit, based on the “MVA rating per bridge” and the nominal kVs.
6. Enter a memo.
The memo is for any notes you wish to keep for this dc line. It can have up to 512 characters.
Click on the … button near the upper right corner of the text area next to the Memo field to open the Supplemental Object Properties dialog box with a data grid to enter data for the following data fields:
7. In/Out of service date: Click on the … button and enter the desired dates. See the Details and Techniques section “In/Out of service and tags” for more information.
8. Tags: Enter list of tag strings separated by semicolon. The tags are for organizing objects that are related for some purpose. Please see documentation for Network | Apply Tag for more information.
9. User-defined fields: These are custom data fields that are defined by the user. Please see documentation for File | Preferences for information about how to specify the template for these data fields.
10. Press OK to close the dialog box.
A new dc line symbol will be shown connecting the terminal buses.
Main Window
NETWORK MENU