The Merge Files command in the Main Window allows you to compare the content of two OneLiner binary files, file A and file B, and to copy the changes into file A. The comparison can take into account the common base file, from which file A and file B were created to identify change conflicts, which are data fields that had been changed in both files. This 3-way merge feature is particularly useful in updating the team’s base case with work cases from the team members.
Note: OneLiner version 14 and earlier had a command called MERGE FILE. That command had been renamed “ADD FILE” in this version.
TO MERGE ONE ONELINER FILE WITH ANOTHER FILE:
1. Select the File | Merge command.
A standard File Open dialog box will appear asking you to select the file A and file B (in that order) to compare.
Note: This command will be disabled if it is executed with a file already open in OneLiner, this file will be always be used as the file A in the comparison, and the program will only ask you to select file B.
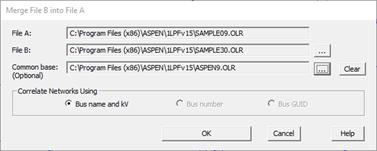
A dialog box will appear allowing you to enter the comparison options.

2. Select desired file A, file B, and optionally the “common base” file. Click on the corresponding … button next to the text box with file name
Note: The file A selection and Swap AB button will be disabled if you executed this command with a file already opened in OneLiner.
3. Select the method in which the two files will be correlated. Click on:
Bus name and kV: Two buses, one from each input file, are considered to be same bus if they have the same name and nominal kV.
Bus Number: Two buses, one from each input file, are considered to be same bus if they have the same non-zero bus number. If the bus numbers are both 0, the two buses are considered the same if their names and nominal kVs are identical.
Bus GUID: Two buses, one from each input file, are considered to be same bus if they have the same GUID.
4. Press OK.
The dialog boxes for the file name and the comparison options will disappear and the comparison will commence.
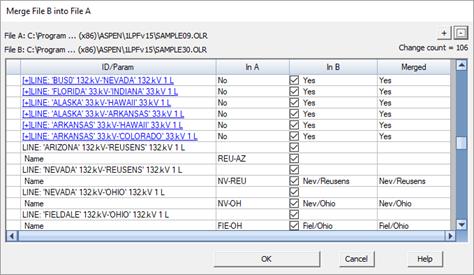
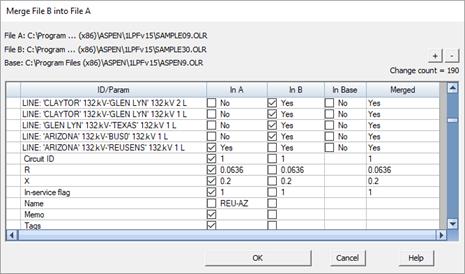
When the comparison is finished, a dialog box will appear with a grid browser showing the comparison results, to let you select the changes to be merged to file A.
The following picture shows the dialog to merge file B into file A without the common base file:

The following picture shows the dialog to merge file B into file A, taking into account the common base file:

5. Select the changes you wish to include in the Merged File by marking the corresponding check boxes in the browser. The browser’s “Merged” column shows the final outcome of the merge operation.
6. Press OK to apply the selected changes to file A and close the dialog box.
Note: For each ADX file that you apply, OneLiner will automatically save a log file of all the changes from the ADX file that you had selected. The log also includes the status of whether or not each change was successful. The program uses the following pattern for the log file name:
changelog_AAAA+DDDD_NNNN.csv
Where: AAAA is the name of the current OneLiner file; DDD is the name of the ADX file; NNNN is a random serial number to make the file name unique.
The log file will be saved in the same folder where the OneLiner file is located. If the folder is read-only, the log file will be saved in the Windows %TEMP% folder.
Main Windows
FILE MENU