The bus selector is utilized by a number of commands to help you select a set of buses. These include:
•Network | Boundary Equivalent
•Faults | Solution Report
•Faults | Voltage-Sag Analysis | Run Batch
•Faults | Ground Current Calculator
•Faults | Arc Flash Hazard Calculator
•Faults | Bus Fault Summary
•Faults | Line End/Out Fault Summary
•Check | Circuit Breaker Short Circuit Rating.
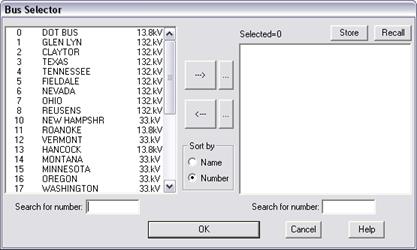
The bus-selector dialog box looks like this:

The list box on the left lists buses in the network that have not been selected. The buses are sorted initially by name or by number.
The list box on the right shows the buses you selected. This list box is empty initially.
Here is how you can select buses with this dialog box.
SEACH FOR BUSES
Change the sort order, if you want, by clicking on one of the radio buttons in the “Sort by” group box.
Enter bus name or number in the “Search for” edit box under the left list box to search for a bus in that list box.
There is a similar Search edit box under the right list box.
SELECT BUSES MANUALLY
Highlight one or more buses in the left list box and click on the “à” button to select them. The program will transfer the selected buses to the right list box.
Highlight one or more buses in the right list box and click on “ß” button to de-select them. The program will transfer the selected buses to the left list box.
SELECT A GROUP OF BUSES
Press the button labeled “…” to the right of the “à” button.
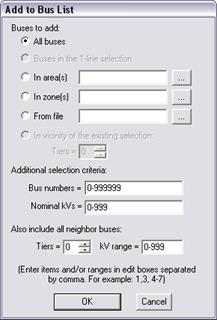
The Add To List dialog box will appear. You can specify the criteria for selecting buses to be transferred from the left list box to the right list box. We will refer to these as the ‘source list box’ and ‘destination list box’, respectively.

Click on:
All buses: This option will select all the buses in the source list box.
Buses in the 1-line selection: This option is available only if you have highlighted a bus or a branch on the one-line diagram prior to using the Bus Selector. This option will select the bus or the terminals of the branch if they are in the source list box.
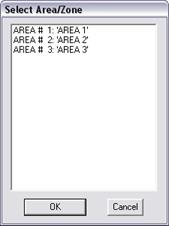
Buses in area(s): This option will select buses in the source list box that belong to the areas you specify. Type the area number as a comma delimited list, e.g., “2,3-5,10” (without the quotes), into the edit box. Alternatively, press the button labeled ‘…” to the right to select the areas from a dialog box.

Buses in zone(s): Same method as for “Buses in area(s)”, except this option will select buses in the source box that belong to the zones you specify.
Buses from file: To select buses within a bus-list file if those buses are in the source list box. The file must be of the bus-list format of Section H.2.
In vicinity of current selection: This option is available only if there are one or more buses in the destination list box. Enter a tier limit of 1 or higher to transfer the neighbors of the existing selection to the destination list box.
Enter additional selection criteria:
Bus number range: The program will exclude buses whose bus numbers are outside of this range.
Nominal kV range: The program will exclude buses whose nominal kVs are outside of this range.
Also include all neighbor buses. Enter a kV range. This option will add to the list buses in the source list box that are in the vicinity of the buses that were already selected.
Press OK.
The program will transfer the selected buses to the destination list box.
DE-SELECT A GROUP OF BUSES
To de-select a group of buses based on certain criteria, press the button labeled “…” to the right of the “ß” button.
The Add To List dialog box will appear. You can specify the criteria for selecting buses to be transferred from the right list box to the left list box.
The instructions are the same as those for selecting buses. The only difference is that the ‘source list box’ is the right list box and the ‘destination list box’ is the left list box.
When you press OK, the program will transfer the selected buses from the right list box to the left list box.
SAVE THE SELECTED BUSES TO A FILE
Press the Store button at the upper right corner of the Bus Selector dialog box to store the selected buses to a file.
A Save-File dialog box will appear to ask you for the file name.
Use the controls in the standard dialog box to name the bus-list file.
The selected buses are stored in a text file of the format described in Section H.2. You can retrieve this list later with the Recall button.
CLOSE THE BUS SELECTOR
Press OK in the Bus Selector dialog box when you have collected the buses you want in the right list box.