OneLiner executes Data Mapping Scripts in the RDBI library to translate relay settings from manufacturer files and external databases to the relay data format suitable in OLR network. Data mapping scripts are written in the ASPEN Relay Database scripting language, which is based on the Delphi programming platform. Starting with OneLiner V14.8, the program also supports Data Mapping Tables in relay data import. Each data mapping table is a collection of rows with easy to specify rules for calculating parameters of OneLiner OC and DS relay elements from external setting data of given template(s). The program automatically compiles Data mapping table into a mapping script and executes it during relay setting import. With the intuitive row/column format, data mapping tables can be built by users with no requirement of script programming skills.
The OneLiner RDBI library editor tool RLYLIBMAP5.exe provides an integrated development environment for building data mapping tables and scripts. The rest of this section will include details on how to use the editor tool to create new data mapping table file, to edit existing data mapping table / script files as well as to test run and debug them.
TO USE THE DATA MAPPING TABLE EDITOR
The Data mapping table editor will appear when you create a new mapping table or when you open a mapping table file.

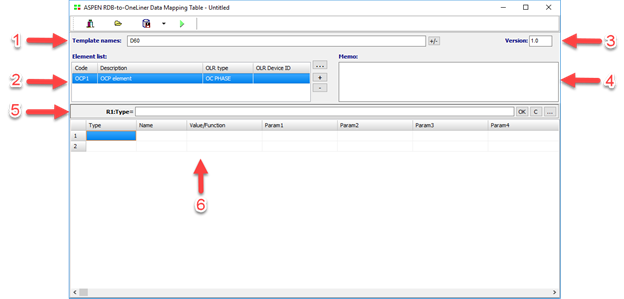
The data mapping table editor main components are shown in the picture above:
1. Name of the external relay setting data template(s) supported by the mapping table: data mapping table can be built to support one or several relay setting templates when they have similar settings. A common example is the case of relays of the same make and model but of different firmware versions. These relays will typically have only few minor differences in their settings.
2. List of OneLiner relay elements to simulate the relay functions in OneLiner. Each OneLiner relay element must have the following attributes:
- Element code: a short and unique string to identify the element in the data mapping rules.
- Element description: Description string that the import relay wizard will display in the Select Element dialog box.
- OneLiner relay type: can be OC Ground, OC Phase or a name of a relay type in OneLiner Distance relay library.
- OneLiner device ID: [optional] value of the OneLiner relay ID field.
3. Version: user defined version number.
4. Memo: memo field for additional information.
5. Edit box for data entry in the selected table cell: You must always enter cell data in this edit box and commit the data to the selected table cell. Click on the edit box or press Enter to enter the data entry mode with the edit box is the only active control. You can also use the command buttons next to the edit box:
 - Commit
data
 - Cancel
 - Open a
drop down list with possible functions and variable names.
You must press Enter or Escape keys to get out of the data entry mode to perform other operations in the mapping script editor.
6. Data mapping rules: You can enter direct value assignment as well as calculation formula for parameters of the imported OneLiner overcurrent or distance relay elements. You can also include calculation of temporary variables to be used in other table rules. Enter one data mapping rule in each table row with the following fields:
- Type: Type of ouput, which can be either 1) a OneLiner overcurrent or distance relay model parameters; or 2) a variable of type String, Boolean or Numeric
- Name: Name of OneLiner relay element parameter of name of a temporary variable. Relay parameter name must be entered in the format: ELECODE.ParamName where ELECODE is the relay element code and ParamName is the name of OneLiner relay parameter.
- Value/function: Value assignment or name of name of a built-in mapping table. For direct assignment, you can enter a literal numeric value or a string value enclosed in single quotes. You can also enter reference to relay setting enclosed in square brackets in the format [TABLE.FIELDNAME] or [TSETTING.GROUPNAME|SETTINGNAME] where TABLE is the name of the RDB table: TRELAY, TREQUEST, etc. and FIELDNAME is the internal name of the ASPEN RDB data field in the table.
- Function parameters: required parameters of the built-in function in the previous column.
NOTE: You can enter in value and function parameter columns name of a temporary variable or of OneLiner relay element parameter enclosed in curly brackets.
Following table shows the list of supported built-in data mapping table functions and their parameters.
|
Function name |
Parameters |
Note | |
|
AND |
BooleanVar1, BooleanVar2 |
Logic operator AND |
|
|
CONCATENATE |
StringVar1, StringVar2 |
Concatenate all stringVars |
|
|
COPY |
SourceString, FromPos, Count |
Copy
count character length part of |
|
|
DATASOURCEINFO |
AttributeName |
Lookup value of a Datasource Info attribute |
|
|
ELSEIFBLOC |
Start Else if clause of IFBLOC |
| |
|
ELSEBLOC |
Start Else clause of IFBLOC |
| |
|
ENDIFBLOC |
End of if bloc |
| |
|
EQUATION |
NumericVar1, Operator, NumericVar2, Operator, NumericVar3, ... |
Evaluate equation. Supported operators: +=*/ () |
|
|
FIND |
SubString, SearchString |
True if SubString is found in SearchString |
|
|
CURVEMAP_GEURS |
URScurve |
Map GE URS curve to ASPEN curve name |
|
|
IF |
BooleanVar1,
TrueResult, FalseResult/ElseBooleanVar2, TrueResult2,
FalseResult/ |
Return TrueResult when the corresponding Boolean var is true |
|
|
IFBLOC |
Condition |
Start of IFBLOC. Rows in the bloc will be processed only when Condition is TRUE | |
|
ISSAME |
Var1, Var2 |
Return true if Var1 and Var2 are equal |
|
|
LENGTH |
StringVar |
Return number of characters in StringVar |
|
|
NOT |
BooleanVar |
Logic operator NOT |
|
|
OR |
BooleanVar1, BooleanVar2 |
Logic operator OR |
|
|
POS |
SubString, SearchString |
Return the position of Substring in SearchString |
|
|
RDBIPARAM |
AttributeName |
Lookup value of a RDBI attribute |
|
|
SETTINGVALUE |
GroupName, SettingName |
Return value of the desired setting |
|
|
STRBREAKLEFT |
SourceString, Delimiter |
Return the part of SourceString before the delimiter |
|
|
STRBREAKRIGHT |
SourceString, Delimiter |
Return the part of SourceString after the delimiter |
|
|
STRING |
NumericVar |
Return string representation of NumericVar |
|
|
TRIM |
StringVar |
Return StringVar with trailing and leading blanks removed |
|
|
VALUE |
StringVar |
Return numeric value of StringVar |
|
To test run a data mapping table click on the tool bar
button Run  : The
program will compile the table into the corresponding script, open it in the
script editor and commence execution of the editor/debugger Run command.
TO USE THE DATA MAPPING SCRIPT EDITOR
Mapping script for data transfer to OneLiner will include functions for calculating OneLiner relay parameters from the external setting data. Conversely mapping script for data from OneLiner will include logic for calculating value of setting in external data source from the selected OneLiner relay.
The Mapping Script Editor will appear when you open a data mapping script file in the RDBI library editor tool. The editor features drag-and-drop interface designed specifically for developing data mapping scripts. The editor is an integrated development environment for building mapping scripts in which you can compile and debug script programs using built-in commands.

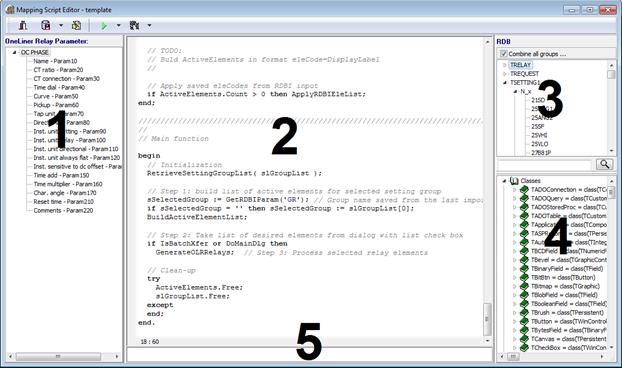
The Script Editor window has five panels as shown in the picture above:
1. Panel 1: The list of parameters/setting names of the target relay. For script that maps data from relay database to OneLiner, this list contains all parameters of the selected OneLiner relay type. For script that maps data from OneLiner to relay database, this list contains all setting of selected relay database setting type.
2. Panel 2: The code editor.
3. Panel 3: The list of parameters/setting name of the source relay type. For script that maps data from relay database to OneLiner, this list contains all parameters of the selected OneLiner relay type. For script that maps data from OneLiner to relay database, this list contains all setting of selected relay database setting type. During code editing, if you double click on an entry in the list, the function call for retrieving the selected parameter or setting will be inserted at the cursor location in the editor.
4. Panel 4: The list of built-in and user-defined function is on the lower right side. During code editing, if you double click on an entry in the list, the function call code will be inserted at the cursor location in the editor.
5. Panel 5: The output message space is in the middle bottom. When compiling and running script, error, warning and information messages will appear in this area.
EDIT SCRIPT DESCRIPTION
Click on the button  on the editor window toolbar.
A dialog box will appear to let you enter description of the script
program.
GENERATE SCRIPT CODE FOR RELAY TYPE OR PARAMETER
Right click on relay type or parameter name in the list on the left side of the script editor. A popup menu will appear.
Select Generate script code to place Delphi code for the selected list item in Windows clipboard.
TEST RUN AND DEBUG SCRIPT PROGRAM
Use commands under the Run tool bar button:
1. Compile (F7): Compile script code.
2. Run (F5): execute script code. Calculation result will be displayed in a dialog box.
Note: The Mapping script editor is hard coded to automatically use the relay setting in database location with name ‘XFER’ in running the script. You will need to copy to this location the relay with settings you wish to use to test-run your mapping script. If your relay database does not have location with this name, a dialog box will appear to let you select desired relay settings request each time you to run script.
3. Step (F10): execute current script code line.
4. Stop (Ctrl-F7): terminate script execution.
5. Add/Remove breaker point (F9): create/delete execution breaker point on current code line.
6. Evaluate (Ctrl-F2): display value of script variable at the cursor.
7. The script execution for debugging purposes. The code editor is in the read-only mode in this view.
SAVE COPY OF THE SCRIPT TO FILE HARD DRIVE
Click on the button  on the editor window toolbar.
You can also select Save As | Save to File. A dialog box will appear to let
you select a disk folder and enter file name.
CLOSE THE SCRIPT EDITOR
Click on the button  on the editor window
toolbar.