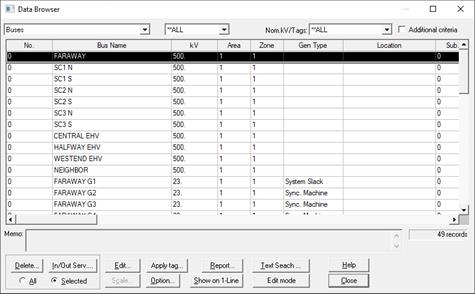
The Data Browser command in the Main Window activates the Data Browser, a tool that allows you to review and edit data for all the network elements and protective devices, including those that are not visible on the one-line diagram. Each page of the browser lists one type of object. There are separate pages for buses, breakers, generators, voltage controlled current sources, type-3 wind plants, converter-interfaced resources, loads, shunts, switched shunts, switches, transmission lines, dc lines, 2-winding transformers, 3-winding transformers, phase shifters, areas, zones, mutual-coupling parameters, circuit breakers, series capacitors, relays, and logic schemes. You may also filter the output by the objects’ area and zone affiliation, by their nominal kV or tags, and by other selection criteria.
The Area and Zone pages provide the only means of modifying the area and zone data.
The “Scale Generator” and “Scale Load” commands are available within the generator and load pages.
You can customize each page of the Browser by specifying which parameters you want listed and the sort order. See “TO CUSTOMIZE THE DATA BROWSER” below.
TO OPEN THE DATA BROWSER:
1. Select the Tools | Browser command.
The Data Browser will appear on the screen. The Browser dialog box is resizable: You can make it bigger or smaller by clicking on an edge and dragging it with the mouse.
2. Select the type of object to be listed.
Click on the Type drop down list box and select one of the following:
Areas: Attributes of areas, including the scheduled inter-area import/export schedule and area slack bus.
Buses: Attributes of buses. For Power Flow, the bus type is “PV” if it is a generator bus and it regulates voltage. Otherwise, it is a “PQ” bus.
Breakers: Attributes of breakers.
Impedance Correction Tables: Attributes of impedance correction tables for phase shifters.
V-controlled current sources: Attributes of voltage-controlled current sources.
Type-3 Wind plants: Attributes of type-3 wind plants.
Converter-interfaced resources: Attributes of converter-interfaced resources.
Generators: Attributes of generators and generating units.
Lines: Attributes of transmission lines.
Loads: Attributes of loads.
LTC Transformers: Attribute of load tap changes.
Phase Shifters: Attributes of phase shifters
Shunts: Attribute of capacitors and reactors.
Switched Shunts: Attributes of switched shunts.
Series Capacitor/Reactors: Attribute of series capacitor (with or without MOV) and series reactors.
Switches: Attributes of switches.
Transformers, 2-Winding: Attributes of 2-winding transformers.
Transformers, 3-Winding: Attributes of 3-winding transformers.
DC Lines: Attributes of 2-terminal dc lines.
Zones: Attributes of zones.
Zero-sequence Mutuals: Line pairs and their zero-sequence mutual coupling impedance.
Breakers/Relay Groups: Attributes of breakers/relay groups.
Overcurrent Relays - Ground
Overcurrent Relays - Phase
Distance Relays - Ground
Distance Relays - Phase
Differential Relays
Voltage Relays
Reclosers
Fuses
Logic Schemes
The Data Browser will display the information you selected. The “Lines” page is shown below.

3. Filter the list by area or by zone.
The area/zone option is set initially to “**ALL”, which means all zones and areas. Click on the 'Area/zone' drop down list box and select an area or a zone of interest.
Note: This option is disabled when area or zone information is being displayed.
The Data Browser will display only those network elements and relays within the selected area or zone.
4. Filter the list by nominal kV or tags.
This option is set initially to “**ALL”, which means all voltages. Click on the ‘KV/Tags' drop down list box and select a voltage level or tag.
The Data Browser will display only those network elements and relays that match the nominal kV or tag you selected.
5. Apply additional data selection criteria.
This option is set initially to unchecked, which means no additional selection criteria are being applied. Mark the ‘Additional criteria' check box. The Additional Data Selection Criteria dialog box will appear:
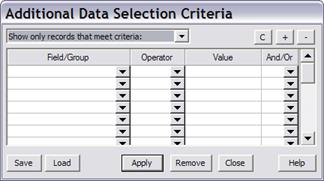
Click on the combo box to select filter method: ‘Show only records that meet criteria’ or ‘Exclude all records that meet criteria’.
Enter criteria: Criteria are built from conditional expressions that are joined by And or Or logic operator. Expressions in criteria can also be grouped together using parentheses.
Field/Group: Select data field name or parentheses to mark begin and end of group.
Operators:
= Equal to
!= Not equal to
> Greater than
>= Greater than or equal to
< Less than
<= Less than or equal to
Like Match text. Use wildcard % to match any character(s).
Not like Opposite of Like
In Find match in semicolon delimited list of value items
Not in Opposite of In
Value: conditional expression value. For expression with operator In or Not In enter list of values separated by semicolon.
Press C button to clear data on the current row.
Press + button to insert a new row in criteria grid before the current row.
Press – button to remove current row from criteria grid.
Press Save button to save criteria grid to a disk file.
Press Load button to load saved criteria from a disk file.
Press Apply button to apply and Click on Remove button to remove filter. The dialog box will close and the data browser will be refreshed to show the chosen filter action.
Press Close button to cancel all changes and close the dialog box.
5. Change the sort order or a column.
Click on the title bar of any column to have the grid sorted by the items in that column.
Successive clicking on the same column toggles the sort order between ascending and descending.
6. Search the grid for a specific string.
Click on the Text Search button near the bottom right corner of the Data Browser. A dialog box will appear.
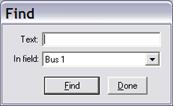
Enter in the Text edit box the string or substring that you are seeking.
Select a column using the In Field drop down list box.
Press Find to locate the next match.
Press Done when you are finished searching.
7. Apply/Remove/Rename tag
Click on "Tag" button. The Data Record Tag dialog box will appear showing list of all tags found in data records currently displayed in the browser table.
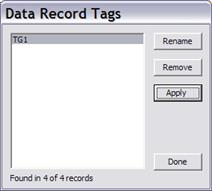
To apply new tag(s) to all records click on "Apply". A dialog box will appear to let you enter one or multiple new tags. Tags are text strings separated by semicolon.
To rename an existing tag, highlight it and click on "Rename". A dialog box will appear to let you enter the new tag name.
To remove an existing tag, highlight it and click on "Remove".
8. Edit a network element or relay.
Double-click on a row in the grid. Alternatively, select the element and click on "Edit". The properties dialog box for the element will appear.
Make necessary modifications and press "OK". The dialog box will disappear and the grid will be updated automatically.
9. Locate a network element or a relay on the one-line diagram.
Select a network element or relay on the grid by click on its row. Then click on the Locate on 1-Line button.
The Data Browser will disappear. The item you selected will appear highlighted on the screen. For invisible buses, this command will highlight the nearest visible bus.
TO EDIT OBJECT ATTRIBUTE DATA IN THE BROWSER TABLE:
1. Turn on the Edit mode by clicking on the Edit mode button.
The title text of the browser window will change from “Data Browser” to “Data Browser – Edit Mode” to show that it is in the Edit mode.
2. Edit object data in the grid.
Click on the grid cell with the data you want to edit. If the edit cursor will appear in the cell, this data field is editable and you can make changes to the data.
If desired, you can also click on the Paste… button to paste the data that you had copied to the clipboard from a single or a block of cells in a spreadsheet.
3. Commit changes to the OneLiner file.
Click on the Commit button. The program will perform the data validation check on the newly entered data.
If the commit is successful, an information message box will appear. Click on OK to close the message box and return the data grid to the Browser mode.
4. To exit the edit mode without saving any data changes
Click on the Cancel button. A confirmation message box will appear.
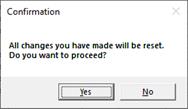
Click the Yes button to close the message box and return the data grid to the Browser mode.
Click the No button to continue using the Edit mode.
TO TAKE OBJECT(S) IN OR OUT OF SERVICE:
1. Take a network element or relay in or out of service.
Click on ‘Selected’ radio button and select an element if you want to perform the operation on just one object. Click on ‘All’ radio button if you want to perform the operation on all objects currently listed in the data browser table.
Select an element and click on "In/Out Serv.". The element(s) will toggle between in-service and out-of-service.
TO DELETE AN OBJECT(S):
1. Delete a network element or a relay.
Click on ‘Selected’ radio button and select an element if you want to delete just one object. Click on ‘All’ radio button if you want to delete all the objects currently listed in the data browser table.
Press "Delete". The element(s) will be deleted, and will disappear from the list.
Note: Areas and zones cannot be deleted. Also, the Delete button is disabled when the one-line locked by the Diagrams | Lock One-Line command.
TO SCALE GENERATION OR LOAD:
1. Click on the Type drop down list box and select either Generator or Load.
2. Change the Area/Zone and kV filters, as needed, to list just those generators or loads that you wish to scale.
3. Specify a scaling factor and scale the load or generation.
Press "Scale". A dialog box will appear asking you for the MW and MVAR scaling factors.
Enter the scaling factors and click on "OK".
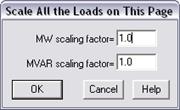
The MW and/or MVAR value for all the elements listed on the current page will be multiplied by the scaling factors you entered.
TO VIEW AND EDIT AREA DATA:
1. View and edit Area data.
The Data Browser is the only place where you can view and edit area data.
Select “Area” in the Type drop down list box. Select an area in the grid and click on Edit. A dialog box with the area data will appear.
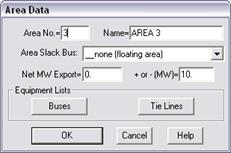
Area No.: Area number ranging from 0 to 9999. When you change the area number, the program automatically updates the area number of all the buses within the area.
Name: A 12-character area name. Any alphanumeric characters can be used except for the string delimiter (single or double quotation mark).
Area Slack Bus: Click on the drop down list box and select the area slack bus. The Power Flow Program will adjust the MW output of this generator to enforce the net-export constraint. Select “__none (floating area)” if you do not want the Power Flow Program to enforce the Net MW Export constraint.
Net MW Export: Net MW export target. A positive value means power is shipped out of the area through tie lines.
2. View bus and tie-line lists for an area.
Click on the Buses button in the Area dialog box. A dialog box will appear displaying all of the buses within this area.
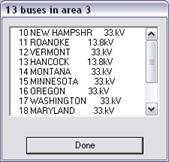
Click on "Done" to close the 'Buses in Area' dialog box.
Click on the Tie Lines button to see a list of tie lines. A dialog box will appear displaying all the transmission lines, phase shifters, and 2-winding transformers that span the current area and its neighbors. The area number of the neighbor is shown at the end of each entry.
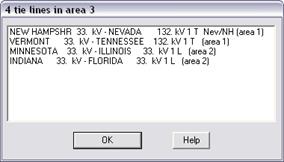
Click on "OK" to close the 'Tie Lines in Area' dialog box.
TO VIEW AND EDIT ZONE DATA:
1. View and edit Zone data.
The Data Browser is the only place where you can view and edit zone data.
Select “Zone” in the Type drop down list box. Select a zone in the grid and click on Edit. A dialog box with the zone data will appear.
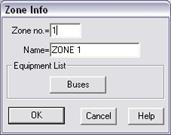
Zone no.: Zone number ranging from 1 to 9999. When you change the zone number, the program automatically updates the zone number of all the buses within the zone.
Name: A 12-character zone name.
2. View bus list for a zone.
Click on the Buses button in the Zone dialog box. A dialog box will appear displaying all of the buses within this zone.
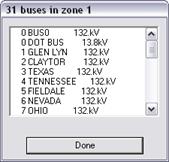
Press Done to close the 'Buses in Zone' dialog box.
TO CREATE A REPORT WITH THE CONTENTS OF THE GRID:
1. Click on "Report" to generate a text file containing the equipment or information that is being displayed by the Data Browser.
The standard file-save dialog box will appear asking you to enter the name of the report file.
Click on ‘Save as type’ and select Excel CSV file to create coma-delimited text file format (*.CSV) that you can use as input to Microsoft Excel.
Click on “Save as type” and select Bus List File (*.TXT) to create a bus list file for the equipment being displayed. Bus list files can be used in the Bus Selector dialog when selecting buses for various commands.
Use the controls in the standard file dialog box to specify the name of the report file. Press OK to close the standard file dialog box.
TO CUSOMIZE THE DATA BROWSER
The Data Browser is user customizable. For each page, you can specify which parameters you want displayed and assign a column number to each of the visible parameters. In addition, you can specify the original sort order for the page. Your preferences are stored in the Windows Registry. The program will follow them in subsequent sessions.
1. Click on the “Type” drop-down list box to open the page of interest.
2. Click on the “Option…” button at the bottom of the browser. A dialog box will appear. (This one is for the “Lines” page.)
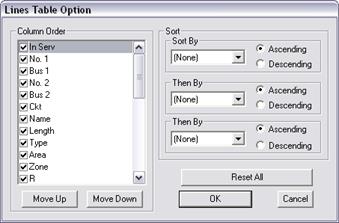
3. Specify items are to be displayed and their column order.
In the Column Order listbox, mark the items that you want to see displayed in the grid. Remove the checkmark for those items you want to omit.
Highlight any one of the checked items in the list box, press the “Move Up” or “Move Down” button to change the column order.
4. Change the sort order.
Use the controls within the “Sort” group box on the right to specify how the data will be sorted.
TO CLOSE THE DATA BROWSER:
1. Press "Done" to close the Data Browser.
Main Window
TOOLS MENU