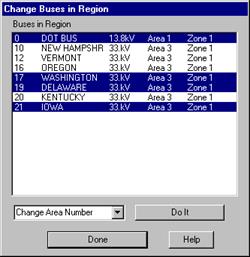
The Change | Buses in Region command in the Main Window lets you change the area or zone number of all the buses that are within in a rectangular region on the one-line diagram. You must trace a region on the one-line diagram before executing this command.
TO CHANGE THE AREA OR ZONE NUMBER OF BUSES IN A REGION:
1. Specify the region.
Drag with the right mouse button down to delineate a rectangular region on the one-line diagram.
You can do this under any zoom setting. The region will be enclosed by a rectangle drawn with the dotted red pen.
2. Select the Network | Change | Buses in region command.
If there are hidden buses in the region, the program will display a dialog box allowing you to choose whether or not to include them in the change command.
The Change Buses In Region box will appear. The program automatically lists the name of all the buses in the selected region. All the entries are highlighted initially.

3. Remove highlight from buses that you wish to exclude from the list.
4. Select change option.
With the drop-down list box, select whether you want to change (1) the area number for the selected buses in the list, or (2) the zone number for the selected buses in the list.
5. Make the change.
Click on Do It. A dialog box will appear asking for the new area or zone number.

Enter the new Area or Zone number and press OK.
6. Repeat steps 3 through 5 if needed. Press Done to close the Change Buses In Region dialog box
Main Window
NETWORK MENU