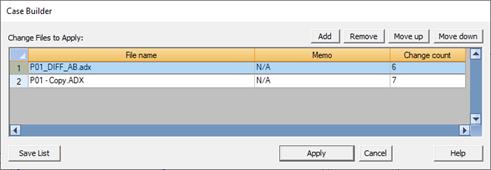
The Case Builder command in the Main Window allows you to modify an existing OneLiner network using one or multiple change files to create a new network with desired content. The change files usually are:
•Network and relay data updates from the neighbor utilities or from the ISO.
•Future projects that need to be included in the network for a study.
The change file includes three types of information:
•Commands to delete network elements or protective equipment
•Commands to add network elements or protective equipment
•Commands to modify the network elements or protective equipment
The command supports the following change file types, which are produced by the Compare and Merge File command:
•ASPEN ADX change file.
•ASPEN CHF change file.
•ANAFAS (5-digit bus number) change file.
You can also apply change files produced by another external tool, as long as they meet the file format specification.
Note: In OneLiner version 14 and earlier, this command was called “Read Change File” and it was designed to read only a single CHF or ANAFAS change file.
TO BUILD A NEW CASE USING ADX CHANGE FILE(S):
1. Select the File | Read Change File command.
A dialog box will appear asking you for the name of the change file.
Note: This menu item is dimmed and cannot be activated after you have deleted one or more objects.
2. Use controls in the standard file dialog box to specify the name of the change file with .ADX extension or the name of the case builder file with .CBX extension.
Press Open.
The Case Builder dialog box will now appear, showing the name of the change file(s) you had selected.

3. Specify desired list of change file(s).
Press Add to select more change file(s).
Press Remove to delete file from the list.
Press Move up/Move down to specify the desired order the change file(s).
[Optional] Press Save List to store the selected ADX file list to a Case builder file.
4. Apply the change file(s).
Press OK.
The Apply ADX File dialog box will now appear, once for each change file in the list, showing the changes in the file to be applied to the network:

Select the changes you wish to include in the new case by marking the corresponding check boxes in the diff browser.
Click OK to apply the selected changes to the case.
For each ADX file that you apply, OneLiner will automatically save a log file of all the changes and the status of whether or not each change was successful. The log file will be saved in the same folder where the OneLiner file is located, and if the folder is read-only, the log file will be saved in the Windows %TEMP% folder. The program uses the following pattern for the log file name:
changelog_AAAA+DDDD_NNNN.csv
Where: AAAA is the name of the current OneLiner file; DDD is the name of the ADX file; NNNN is a random number to make the file name unique.
The following data fields are included in the log:
“Change” The change code, which can have one of these values: ADXIMPORT:ADD- Importing ADX record ADD; ADXIMPORT:MODIFY-- Importing ADX record MOIDFY; ADXIMPORT:DELETE- Importing ADX record MODIFY; ADD-Applying ADX record ADD; DELTE-Applying ADX record DELETE; MODIFY-Applying ADX record MODIFY.
“Obj Type” Data object type
“ID/Param name” Object ID or data parameter name
“Before” Data parameter value before the change
“After” Data parameter value after the change
“Applied” Change application status, which can be one of: Yes- Change was applied successfully; Partial- Some data fields were not been updated because they contain reference to a non-existing data object. When the initial application of ADX file results records with partial status, OneLiner always performs an additional iteration to re-process these records to resolve the references that have been added later in the previous iteration. In those cases, the change records will be listed on multiple rows in the log; Error message- Change application failure
5. Use the Save command to save the updated system file.
TO BUILD A NEW CASE USING A CHF OR ANAFAS CHANGE FILE:
1. Select the File | Case Builder command.
A dialog box will appear asking you for the name of the change file.
Note: This menu item is dimmed and cannot be activated after you have deleted one or more objects.
2. Use controls in the standard file dialog box to specify the name of the change file. The change file can be of the ASPEN format (with .CHF extension) or the ANAFAS format (with .ANA extension).
Note: ANAFAS change files must be of the 5-digit bus number format.
Press Open.
A series of dialog boxes will now appear asking you to confirm the changes, one at a time.
3. Confirm or skip the changes.
When a change-file command is encountered, a dialog box will appear.

Press
Yes: to confirm the current command.
No: to ignore the current command but continue to read the remaining commands.
Rest OK: to confirm the current command and the remaining commands.
Cancel Rest: to ignore the current command and the remaining commands.
After all the commands have been processed, the TTY Window will appear listing all of the changes made to the network.
Select the Menu | Close Window command to close the TTY Window.
The program will automatically place new branches that span existing buses. You can change their appearance with the mouse at any time. The program will show the remaining branches when you place the buses.
4. Optional: Use the Save command to save the updated system file.
Main Window
FILE MENU