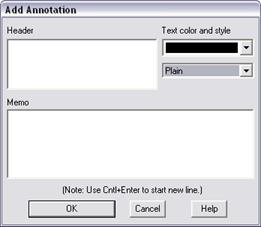
The Add | Annotation command in the DS Relays Window lets you add an annotation anywhere in the R-X diagram. You can use the annotations to label the curves or to mark certain features that warrant special attention. You can also use the annotations as temporary labels for printing and delete them immediately afterwards. The user interface for the annotations is the same as that in the Main Window. The annotation can be saved as part of a curve collection in a PCC file.
To execute this command you must first select the annotation location with the left mouse button.
TO ADD A NEW ANNOTATION:
1. Select the annotation location.
Click the left mouse button once on the desired location of the new annotation.
A red crosshair will appear at that location.
2. Select the Add | Annotation command.
A dialog box will appear to let you enter the new annotation.

3. Enter the header with up to 50 characters in the top edit box.
The header is the text that is visible on the plot.
4. Enter a memo with up to 512 characters in the bottom edit box.
The memo is not visible on the plot. However, the existence of the memo is indicated by three dots “…” after the header. You can view the memo by double-clicking on the annotation header.
5. Select a color for the text .
Eight different colors are available. The default is black.
6. Select a style.
•Plain: Only the header text is shown.
•Marker: A diamond-shaped marker is drawn to the left of the header text.
•Callout: A graphical symbol that connects a point to a rectangle that encloses the header text. The point can be moved independent of the text. See picture below.

•Callout: Vertz line: A callout with a vertical line attached to the point.
•Callout: Horz line: A callout with a horizontal line attached to the point.
7. Press OK.
The dialog box will close and the annotation will appear on the screen.
DS Relays Window
ADD MENU