The Add File command in the Main Window allows you to augment an existing data file with contents of another binary data file.. The two files must have the same MVA base.
Note: This command was called “Merge File” in OneLiner version 14 and earlier.
If a bus with a certain name and nominal kV is found in both files, you have the option of (1) combining the two buses into one automatically, and (2) renaming one of the buses to avoid duplication.
If you choose the “rename bus” option, the program will automatically add a ‘~’ character at the beginning of one of the bus names. The program will show a list of these duplicate buses in the TTY window. After the files are merged, you can then manually combine these bus pairs (with the Merge Bus command) as needed to “stitch together” the two files.
Note: This command allows you to add data from a binary data file only. To add data from a text data file with DXT extension, we suggest that you first open the DXT file and saved it as an OLR file. You will then be able to use this command.
Note: The Add File command yields the best result when there are very few buses that have the same name and nominal kV in the two files. To merge two network that share a large number of common buses, you can use the command Merge File, which is designed to let you review and select the data you want to include in the merge.
IMPORTANT NOTICE TO START-FROM-LINEAR-NETWORK-WORK-SOLUTION USERS
If you are using, or planning to use, the “Start from linear network solution” as the prefault-voltage option for fault simulation, we advise you read the following. The general principle is that you must make sure, prior to merging the files, that (1) the reference generator in the two networks are in phase with each other, and (2) the ID prefix for fictitious branches and generators are the same. There are four possibilities:
Case 1. Neither file has any fictitious generators or fictitious branches that were created previously by network reduction (boundary equivalent). There is no problem in this case, except that you must execute the Network | Set Generator Reference Angle command after the files are merged.
Case 2. File A has fictitious generators and fictitious branches that were created previously by network reduction, but File B does not. In this case, open File A and use the Merge File command to bring in File B. You must execute the Network | Set Generator Reference Angle command after the file is merged, using the reference generator of File A as the reference generator.
Case 3. Both files have fictitious generators and fictitious branches that were created previously by network reduction and the reference generators of the two files are in phase. (By “in phase” we mean that the two reference generators are connected through lines, and there is no phase shift between them in prefault) and the ID prefix for fictitious branches and generators are the same. You can combine them with no problems. After the files are merged, execute the Network | Set Generator Reference Angle command after the file is merged, using the reference generator of either file as the reference generator.
Case 4. Both files have fictitious generators and fictitious branches that were created previously by network reduction and the reference generators of the two files are not in phase. In this case, you must first change the reference generator in one of the files such that the reference generators in the two files are in phase. Also, you must make sure that the two files have the same ID prefix for fictitious branches and generators. Then you can combine them as described in Case 3.
TO JOIN A DATA FILE TO THE CURRENT FILE:
1. With the scrollbar controls, move the viewport to an empty space where you want to place the center of the added network.
This “center” location need not be exact, because you will be able to move the added network later in step 5.
2. Select the File | Add File command.
A dialog box will appear asking you for the name of the data file that you wish to add.
3. Use the controls in the standard file-open dialog box to specify the name of the data file. Press Open.
Once the program accepts the file name, the dialog box will disappear.
4. Buses with same name and nominal kV.
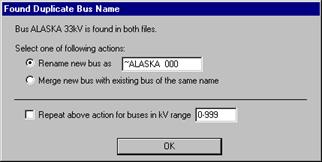
You will see the following dialog box if there is a bus with the same name and nominal kV in both files. You have two options: (1) Rename one of the buses to avoid duplication, and (2) combine the two buses into a single bus.

RENAME ONE OF THE BUSES
Click on the “Rename new bus as” radio button and modify the bus name to the right as needed.
Mark the check box “Repeat above action for buses in kV range” and enter a kV range if you want the program to make similar changes to other buses that are found in both files. Otherwise, the program will prompt you to take action for each occurrence of these buses.
Press OK.
MERGE THE BUSES AUTOMATICALLY
Click on the “Merge new us with existing bus of the same name” radio button. Press OK. The program will automatically merge all the buses that have the same name and nominal kV.
A ghosted one-line of the added network will appear on the screen.
5. Place the added network.
With the mouse, drag the ghosted image to the desired location in the viewport.
Click the mouse outside the ghosted image to permanently place it on the screen.
Main Window
FILE MENU